
Turbocharge Your Tufting Gun: Pro Tips and Techniques for Users
Tufting guns have become increasingly popular in recent years, thanks to their ability to create beautiful and intricate designs in a fraction of the time it would take to create them by hand. Whether you’re an experienced crafter or just starting out, a tufting gun can help you create stunning works of art that are sure to impress. But like any tool, it takes some practice and knowledge to get the most out of your tufting gun. In this article, we’ll share some tips and tricks for getting the most out of your tufting gun, from maintaining it to troubleshooting common issues and creating different textures and effects.
Common Tufting Mistakes & Fixes
Common Tufting Mistakes & Fixes: A Beginner’s Guide to Perfect…
How to Make a Tufted Rug: A Step-by-Step Guide
How to Make a Tufted Rug: A Step-by-Step Guide Tufting…

How to Price Your Rug: A Comprehensive Guide
How to Price Your Rug: A Comprehensive Guide Pricing a…
Tufting Gun Application Areas
Mastering the Art of Tufting Gun Application Areas The versatility…
Evolution and Innovations of Tufting Guns
Tracing the Threads: The Historical Evolution and Innovations of Tufting…
Tufting Gun Price Ranges
Navigating Tufting Gun Price Ranges and Budget Options Embarking on…
Tufting Gun Ergonomics and User Comfort
The Art of Comfort: Exploring Tufting Gun Ergonomics and User…
Tufting Gun Power Sources
Unveiling the Power Behind Tufting Gun Power Sources: Battery-Operated vs.…
Tufting Gun Speed and Efficiency
Mastering Tufting Gun Speed and Efficiency: A Comparative Analysis In…
Tufting Gun Plastic vs. Metal
Decoding Tufting Gun Materials: Plastic vs. Metal Construction In the…
Tufting Gun Needles
Unraveling the Intricacies of Tufting Gun Needles: Sizes and Variations…
Types of tufting guns: Handheld vs. pneumatic
Exploring the World of Tufting Guns: Handheld vs. Pneumatic In…
DIY Tufting Frames
Choosing the Right Materials for DIY Tufting Frames Exploring different…
The article tufted:
Tufting Guns: Maintenance Tips
Keep your tufting gun clean
In the world of tufting, a clean tufting gun is essential for optimal performance and achieving professional-quality results. Just like any other tool, the tufting gun requires regular cleaning and maintenance to ensure its longevity and functionality. In this article, we will explore the importance of keeping your tufting gun clean and provide you with a step-by-step guide to proper cleaning and maintenance.
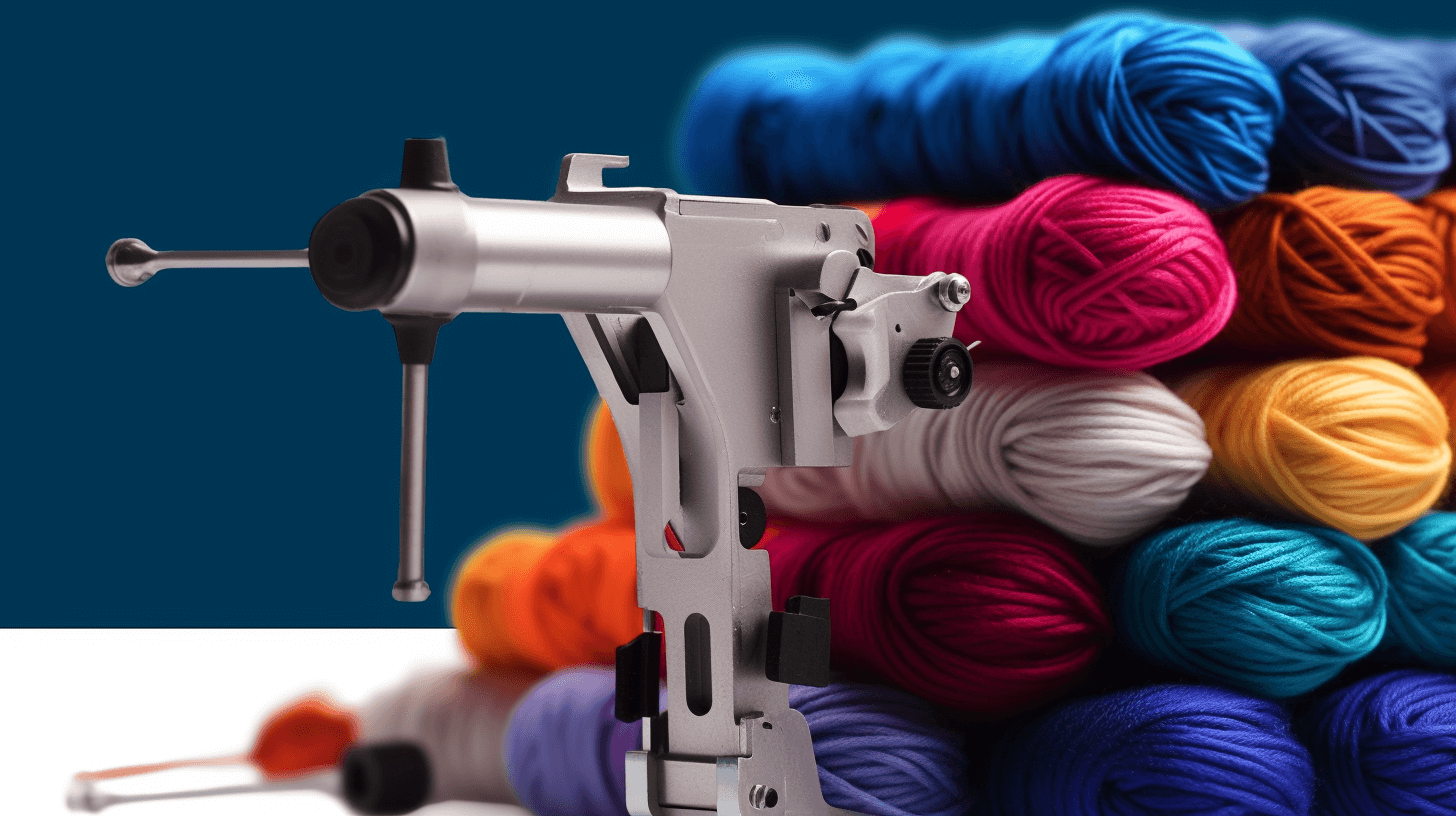
Understanding the tufting gun
Before delving into the cleaning process, it’s crucial to have a basic understanding of the tufting gun and its components. The tufting gun is a powerful tool used to create loops or pile in fabric, often used in various crafts and upholstery projects. It typically consists of a handle, trigger mechanism, needle, and other adjustable parts. Understanding how these components work together will help you comprehend the significance of maintaining cleanliness.
Why cleanliness matters
Maintaining a clean tufting gun is essential for several reasons. Firstly, dirt, lint, and debris can accumulate in the gun’s mechanism, leading to clogs and decreased functionality. A dirty tufting gun may result in inconsistent loop formation or even breakage of threads, compromising the quality of your tufted fabric. Additionally, regular cleaning and maintenance help prevent the buildup of rust and corrosion, ensuring the longevity of your tufting gun.
Step-by-step guide to cleaning your tufting gun
Cleaning your tufting gun doesn’t have to be a daunting task. By following a few simple steps, you can keep your tool in optimal condition. Here’s a step-by-step guide to help you through the process:
A. Preparing the cleaning area and gathering supplies Before starting the cleaning process, create a designated area with a clean workspace. Gather the necessary supplies, including a soft cloth, cleaning solution suitable for the tufting gun, a small brush, and any tools required for disassembling the gun.
B. Disassembling the tufting gun Carefully disassemble the tufting gun according to the manufacturer’s instructions. Take note of the order and placement of the components to ensure proper reassembly later.
C. Cleaning the individual components Clean each component thoroughly using the appropriate cleaning solution and a soft cloth or brush. Pay close attention to areas where debris and residue tend to accumulate, such as the needle and trigger mechanism. Be gentle when cleaning delicate parts to avoid damage.
D. Reassembling the tufting gun Once all the components are clean and dry, carefully reassemble the tufting gun in the correct order. Ensure that each part is properly aligned and securely fastened according to the manufacturer’s guidelines.
E. Proper storage after cleaning After cleaning, store your tufting gun in a clean, dry place away from dust and moisture. Consider using a protective case or bag to prevent any potential damage during storage.
Additional maintenance tips
In addition to regular cleaning, there are a few maintenance practices that can help keep your tufting gun in optimal condition:
A. Lubrication and adjustment of moving parts Periodically lubricate the moving parts of your tufting gun as recommended by the manufacturer. This will ensure smooth operation and prevent unnecessary wear. Additionally, check and adjust any adjustable settings to maintain consistent tufting performance.
B. Regular inspection for wear and tear Take the time to inspect your tufting gun for any signs of wear and tear. Look for loose screws, worn-out parts, or any other issues that may affect its performance. Promptly address any problems or seek professional assistance if needed.
C. Troubleshooting common issues Familiarize yourself with common issues that may arise with tufting guns, such as needle misalignment or thread breakage. Educate yourself on troubleshooting techniques or consult the manufacturer’s guidelines for guidance.
[slide-anything id=”510″]
Revolutionize Your Carpet Designs with AK-III Tufting Gun
Lubricate moving parts
Regular lubrication of the moving parts in your tufting gun can help keep it running smoothly and prevent it from wearing out prematurely. Use a lubricant recommended by the manufacturer.
Proper maintenance and care are essential for the optimal performance and longevity of a tufting gun. Among the maintenance tasks, lubricating the moving parts of the tufting gun holds significant importance. In this article, we will explore the reasons why lubrication is crucial and provide a step-by-step guide to help you lubricate the moving parts of your tufting gun effectively.
Understanding the tufting gun’s moving parts
To understand the significance of lubrication, it is essential to familiarize yourself with the moving parts of a tufting gun. These components, including the needle, trigger mechanism, and other adjustable parts, require smooth movement for efficient tufting. Proper lubrication ensures that these parts operate smoothly, reducing friction and preventing wear and tear.
Choosing the right lubricant
When it comes to lubricating your tufting gun, selecting the appropriate lubricant is crucial. There are various types of lubricants available, such as oil-based lubricants or silicone-based lubricants. Consider the compatibility with the materials used in your tufting gun and the specific requirements of the manufacturer.
Step-by-step guide to lubricating tufting gun moving parts
To effectively lubricate the moving parts of your tufting gun, follow these steps:
A. Preparing the tufting gun for lubrication Before applying lubricant, ensure that your tufting gun is clean and free from any dirt or debris. Prepare a clean and well-ventilated workspace to work on the gun.
B. Applying lubricant to the moving parts Using the recommended lubricant, apply a small amount to the designated moving parts of the tufting gun. Focus on areas where friction is most likely to occur, such as the needle shaft and trigger mechanism.
C. Wiping off excess lubricant and reassembling the tufting gun After applying the lubricant, use a clean cloth or a lint-free wipe to remove any excess lubricant. Ensure that all parts are dry and free from any residue. Reassemble the tufting gun according to the manufacturer’s instructions.
Maintenance tips and best practices
In addition to regular lubrication, here are some maintenance tips and best practices to keep your tufting gun in optimal condition:
A. Frequency of lubrication The frequency of lubrication depends on the intensity of use. As a general guideline, lubricate your tufting gun’s moving parts every few months or after a substantial period of use. However, it’s important to consult the manufacturer’s recommendations for specific guidelines.
B. Regular inspection and cleaning of moving parts Apart from lubrication, regularly inspect the moving parts of your tufting gun for any signs of wear, damage, or accumulation of debris. Clean the parts as needed and address any issues promptly.
C. Troubleshooting common issues related to lubrication If you encounter any issues with the tufting gun’s performance even after lubrication, refer to the manufacturer’s troubleshooting guide or seek professional assistance. Sometimes, additional adjustments or maintenance may be required.
Check the tension regularly
Maintaining proper tension in your tufting gun is crucial for achieving high-quality and consistent tufting results. Regularly checking the tension ensures that your tufting gun is in optimal condition and can produce even stitches, appropriate yarn pull, and consistent pile height. In this article, we will explore the importance of tension checks and provide a comprehensive guide on how to check and adjust the tension in your tufting gun.
Understanding tension in tufting guns
Tension refers to the resistance or tightness of the yarn as it is fed through the tufting gun during the tufting process. It plays a vital role in controlling the amount of yarn pulled through the fabric and ultimately affects the appearance and durability of the tufted design. The tension mechanism in a tufting gun consists of various components, including tension disks, tension springs, and tension adjustments.
Signs of improper tension
Detecting signs of improper tension is essential for identifying potential issues in your tufting process. Here are some common indicators of tension problems:
A. Uneven or skipped stitches Uneven or skipped stitches can occur when the tension is too tight or too loose. This results in inconsistencies in the tufted pattern and can affect the overall quality of the design.
B. Excessive or insufficient yarn pull If the tension is too high, the tufting gun may pull too much yarn through the fabric, resulting in an overly dense or bulky appearance. On the other hand, insufficient yarn pull can lead to sparse or incomplete tufting.
C. Inconsistent pile height Improper tension can cause variations in the pile height of the tufted design. Some areas may have taller or shorter loops, leading to an uneven texture and compromised visual appeal.
How to check and adjust tension
Checking and adjusting the tension in your tufting gun is a straightforward process that requires attention to detail. Follow these steps to ensure proper tension:
A. Step-by-step guide to checking tension
- Set your tufting gun to the desired tension setting.
- Test tuft a small sample piece of fabric.
- Inspect the tufted stitches for consistency and appearance.
- Make adjustments to the tension if necessary.
B. Methods for adjusting tension in tufting guns Tufting guns typically have tension adjustment mechanisms that allow you to fine-tune the tension. These mechanisms may involve tension disks, tension springs, or other tension controls. Consult your tufting gun’s manual for specific instructions on adjusting the tension and experiment with different settings until you achieve the desired results.
Maintaining optimal tension
To maintain optimal tension in your tufting gun and ensure consistent tufting results, consider the following tips:
A. Regular tension checks and adjustments Make it a habit to check the tension of your tufting gun before starting a new project or periodically during extended use. This proactive approach helps identify any tension issues early on and allows for timely adjustments.
B. Importance of proper yarn selection and handling The type and quality of yarn used in tufting can significantly impact tension. Choose yarns that are suitable for tufting and handle them properly to minimize tension-related challenges. Avoid using yarns that are too thick or too thin for your tufting gun’s capabilities.
C. Tips for troubleshooting tension issues If you encounter persistent tension problems despite regular checks and adjustments, consider seeking advice from experienced tufters or reaching out to the manufacturer for guidance. They may be able to provide specific tips and solutions for your tufting gun model.
[slide-anything id=”526″]
Revolutionize Your Floors with Draywitt Cut and Loop Pile – 2 in 1
Replace worn-out parts
Keeping your tufting gun in optimal condition is essential for achieving consistent and high-quality tufting results. Over time, certain parts of the tufting gun may wear out and affect its performance. In this article, we will discuss the importance of replacing worn-out parts in your tufting gun and how it can positively impact your tufting experience.
Signs of worn-out parts in a tufting gun
Recognizing the signs of worn-out parts is crucial for identifying when replacements are necessary. Here are some common indicators that your tufting gun may have worn-out parts:
A. Irregular or skipped stitches If you notice irregular or skipped stitches in your tufted fabric, it may be a sign that the needle or hook assembly has worn-out components. This can result in inconsistent tufting and compromised design quality.
B. Reduced tension control Worn tension discs or springs can cause difficulties in maintaining proper tension while tufting. You may experience looser or tighter stitches than desired, leading to an uneven tufted surface.
C. Decreased tufting speed If your tufting gun’s performance has noticeably slowed down, it could indicate worn motor or drive components. This can affect the overall efficiency and productivity of your tufting process.
Common parts that may require replacement
Several parts of a tufting gun may require replacement due to wear and tear. Here are some commonly replaced parts:
A. Needle and hook assembly The needle and hook assembly is subject to significant stress during the tufting process. Over time, the needle may become dull or bent, and the hook may lose its sharpness. Replacing these components ensures smooth and precise tufting.
B. Tension discs and springs Tension discs and springs play a crucial role in maintaining consistent tension while tufting. These components can wear out or lose their elasticity over time, leading to tension control issues. Replacing them restores optimal tension control.
C. Motor or drive components The motor and drive components of a tufting gun are responsible for its speed and power. Continuous use may cause these parts to wear out or malfunction. Replacing worn-out motor or drive components restores the tufting gun’s performance.
How to identify and replace worn-out parts
Identifying and replacing worn-out parts in your tufting gun is a straightforward process. Follow these steps:
A. Inspecting the tufting gun for signs of wear and damage Carefully examine your tufting gun for any visible signs of wear, such as rust, bent components, or broken parts. Pay close attention to the needle and hook assembly, tension discs, and other crucial components.
B. Sourcing and purchasing replacement parts Contact the manufacturer or authorized suppliers to source genuine replacement parts for your specific tufting gun model. Ensure compatibility and quality by obtaining parts from trusted sources.
C. Step-by-step guide to replacing worn-out parts Consult the tufting gun’s user manual or online resources for detailed instructions on replacing specific parts. Follow the recommended procedures to safely and accurately replace worn-out components. If necessary, seek professional assistance.
Maintaining and prolonging the lifespan of tufting gun parts
To ensure the longevity of your tufting gun parts and minimize the frequency of replacements, it is crucial to follow proper maintenance practices. Consider the following tips:
A. Regular cleaning and lubrication Clean your tufting gun after each use to remove any debris or buildup that may cause premature wear. Lubricate moving parts as recommended by the manufacturer to reduce friction and enhance smooth operation.
B. Proper storage and handling Store your tufting gun in a dry and secure location to prevent damage from dust, moisture, or accidental drops. Avoid mishandling or subjecting the gun to excessive force, which can lead to component wear or breakage.
C. Following manufacturer guidelines and recommendations Adhere to the manufacturer’s guidelines regarding maintenance schedules, recommended lubricants, and other specific instructions. Following these guidelines ensures that you are taking the necessary steps to maximize the lifespan of your tufting gun parts.
Troubleshooting Tips
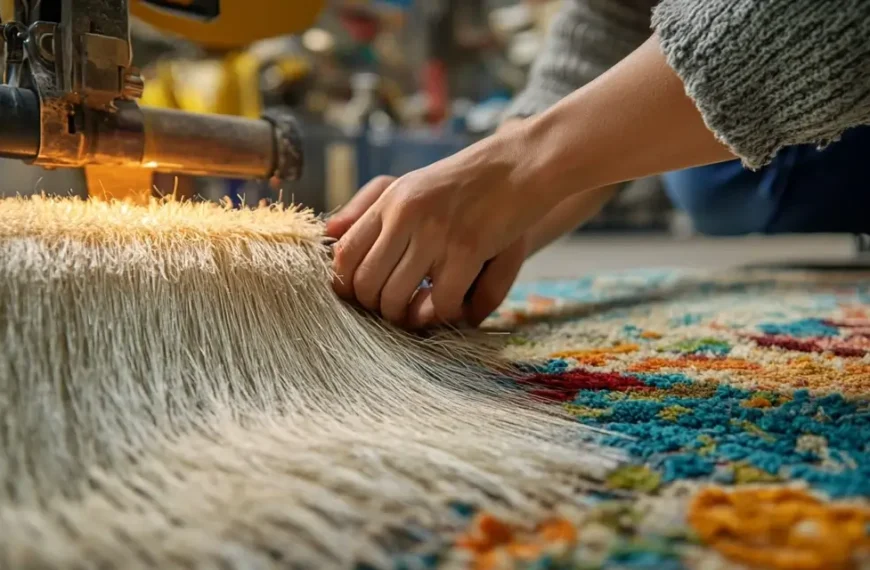
Needle won’t punch through the fabric
Encountering a situation where the needle of your tufting gun won’t punch through the fabric can be highly frustrating, hindering your progress and creativity. In this article, we will explore common reasons behind this issue and provide troubleshooting steps to resolve it, ensuring a smooth tufting experience.
Common reasons for the needle not punching through fabric
Understanding the potential causes of the needle failing to punch through the fabric is the first step in troubleshooting the issue. Here are some common reasons:
A. Incorrect needle size or type Using an inappropriate needle size or type for the fabric you’re working with can lead to difficulties in piercing through the material. Different fabrics require specific needle sizes and styles to ensure optimal tufting results.
B. Dull or damaged needle Over time, needles can become dull or damaged from repeated use. A dull needle may struggle to penetrate the fabric, resulting in unsuccessful tufting attempts. Inspecting and maintaining needle sharpness is crucial for consistent performance.
C. Incorrect fabric thickness or density The thickness and density of the fabric can pose challenges for the tufting needle. If the fabric is too thick or dense, the needle may struggle to penetrate it effectively. This issue is particularly common when working with heavy upholstery fabrics.
Troubleshooting steps to resolve the issue
When faced with a needle that won’t punch through the fabric, consider the following troubleshooting steps to address the problem:
A. Check and adjust needle size and type Verify that you are using the correct needle size and type for the specific fabric you are working with. Consult the tufting gun’s manual or seek expert advice to ensure proper needle selection. Adjusting the needle size or type can significantly improve the tufting process.
B. Replace the needle if dull or damaged Inspect the needle closely for any signs of dullness or damage. If the needle is dull or bent, it is essential to replace it promptly. A sharp and undamaged needle is crucial for achieving clean and precise tufting results.
C. Evaluate fabric thickness and density Assess the thickness and density of the fabric you are using. If it is exceptionally thick or dense, consider using a different tufting technique or opting for a more suitable fabric. Thicker fabrics may require specialized tufting equipment or modifications to ensure successful needle penetration.
Tips for preventing needle issues in the future
To avoid encountering needle-related issues in your tufting projects, consider the following tips:
A. Proper needle selection for different fabrics Take the time to select the appropriate needle size and type for each fabric you work with. Understanding the fabric’s characteristics and choosing the right needle will significantly reduce the chances of encountering needle-penetration issues.
B. Regular needle maintenance and replacement Maintain a regular needle maintenance schedule, including cleaning and sharpening. Replace needles as needed to ensure optimal performance. Regularly inspecting and addressing the condition of your needles will prevent issues before they arise.
C. Proper fabric preparation and handling Properly preparing and handling your fabric before tufting can contribute to a smooth and successful process. Ensure the fabric is clean, free of debris, and properly stretched or secured. Proper fabric tension and positioning can make a significant difference in needle penetration.
Seeking professional assistance if the issue persists
If you have followed the troubleshooting steps and the needle still refuses to punch through the fabric, it may be necessary to seek professional assistance. Consider the following options:
A. Consulting tufting gun experts or technicians Reach out to professionals who specialize in tufting equipment. They can provide further guidance, diagnose any underlying issues, and suggest appropriate solutions to overcome the problem.
B. Exploring alternative tufting methods If the needle-penetration issue persists despite your best efforts, it might be worth exploring alternative tufting methods that are better suited for your specific project or fabric. Different techniques, such as hand tufting or using different tufting equipment, may yield better results.
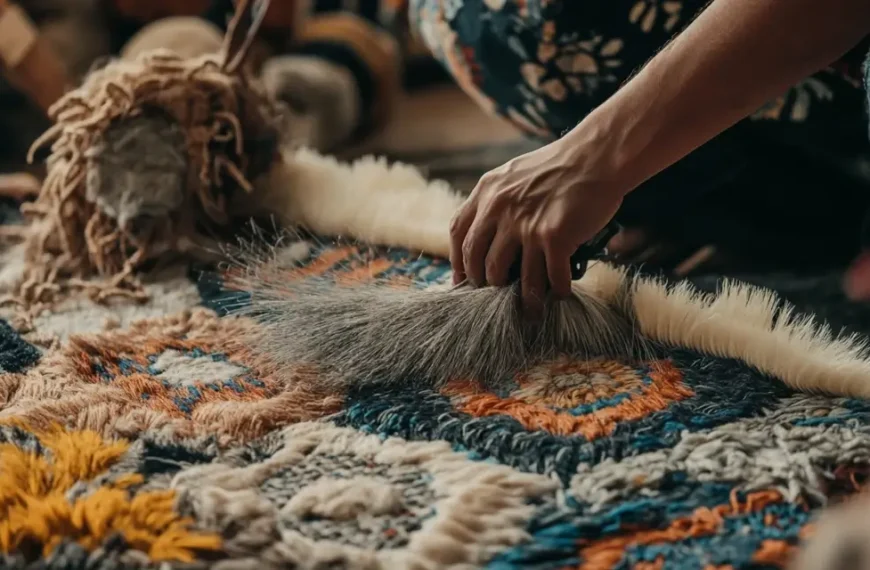
Stuck fibers
When using a tufting gun for your creative projects, encountering stuck fibers can be frustrating and impact the quality of your work. In this article, we will explore the causes of stuck fibers and provide techniques for their removal, as well as preventive measures to avoid this issue in the future.
Causes of stuck fibers
Understanding the reasons behind stuck fibers is crucial in addressing the issue effectively. Here are some common causes:
A. Improper fabric preparation Inadequate fabric preparation, such as not properly stretching or securing the fabric, can lead to fibers becoming stuck in the tufting gun. Uneven tension or loose fabric can cause fibers to get caught in the needle or machinery.
B. Incorrect tufting gun settings Incorrect adjustments or settings on the tufting gun can contribute to stuck fibers. If the needle height, speed, or other settings are not properly calibrated, fibers may get trapped or tangled in the gun.
C. Low-quality or incompatible materials The quality and compatibility of the materials used in tufting play a significant role. Low-quality or poorly processed fabrics can shed fibers more easily, leading to them becoming stuck in the tufting gun. Similarly, using incompatible materials, such as thick or dense fabrics with a tufting gun not designed for them, can cause fibers to get lodged.
Techniques for removing stuck fibers
If you encounter stuck fibers in your tufting process, here are some effective techniques for their removal:
A. Gently brushing or combing the fibers Use a soft-bristle brush or fine-tooth comb to gently brush or comb the stuck fibers in the direction of their natural alignment. This method helps dislodge the fibers without causing damage to the tufted design.
B. Using a lint roller or tape Roll a lint roller or wrap adhesive tape around your fingers, sticky side out, and dab or roll it over the area with stuck fibers. The adhesive surface will pick up the loose fibers, freeing them from the tufting gun.
C. Steam or heat treatment Steam or heat can help loosen stuck fibers. Use a handheld steamer or carefully pass a steam iron over the affected area, keeping a safe distance to avoid damaging the fabric. The heat and moisture will relax the fibers, making it easier to remove them.
Preventive measures to avoid stuck fibers
Prevention is key to avoiding the frustration of stuck fibers. Consider the following preventive measures:
A. Proper fabric selection and preparation Select fabrics that are suitable for tufting and ensure they are properly prepared before starting your project. Stretch and secure the fabric tightly to avoid loose or uneven areas that can trap fibers.
B. Adjusting tufting gun settings Familiarize yourself with the settings and adjustments on your tufting gun. Follow the manufacturer’s instructions to calibrate the needle height, speed, and other relevant settings based on the fabric you are using. Properly adjusted settings can minimize the likelihood of fibers getting stuck.
C. Using appropriate materials Choose high-quality materials that are compatible with your tufting gun. Opt for fabrics with minimal shedding and consider the thickness and density of the fabric in relation to your tufting gun’s capabilities. Using the right materials can significantly reduce the chances of fibers becoming stuck.
Seeking professional assistance if needed
If you have tried the techniques outlined above and still struggle with stuck fibers, it may be time to seek professional assistance. Consider the following options:
A. Consulting tufting experts or technicians Reach out to professionals who specialize in tufting. They can provide expert guidance, diagnose any underlying issues, and offer solutions tailored to your specific situation. Their experience and knowledge can be invaluable in resolving the problem.
B. Exploring alternative tufting methods If the issue persists despite your best efforts, it might be worth exploring alternative tufting methods that are better suited for your project or fabric. Hand tufting or using different tufting equipment may offer a solution to overcome the problem of stuck fibers.
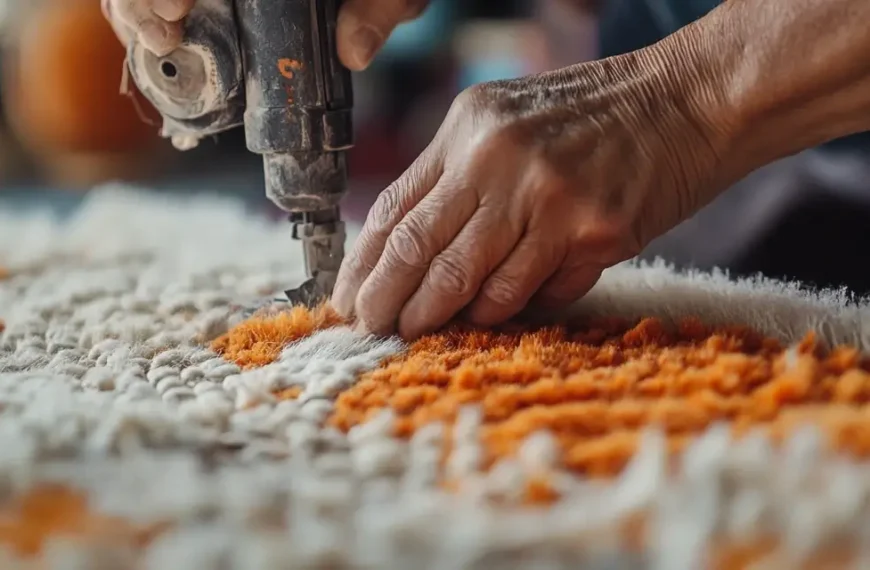
Uneven pile height
In the world of tufting, achieving an even pile height is essential for creating visually appealing and professional-looking designs. However, many tufting enthusiasts face the challenge of uneven pile height. In this article, we will explore the importance of uniform pile height and discuss the causes of unevenness, along with techniques to overcome this issue.
Understanding pile height in tufting
A. Definition and significance of pile height Pile height refers to the length of the tufted yarn or fibers that extend above the backing fabric. It plays a crucial role in the overall appearance and texture of tufted designs. Consistent pile height ensures a smooth and uniform surface, enhancing the visual appeal and quality of the finished piece.
B. Factors influencing pile height variation Several factors can contribute to uneven pile height in tufting. These include variations in tufting gun pressure, fabric tension inconsistencies, and improper needle height adjustment. Understanding these factors is key to troubleshooting and achieving a uniform pile height.
Identifying the causes of uneven pile height
A. Inconsistent tufting gun pressure Inadequate or inconsistent pressure exerted by the tufting gun can result in variations in pile height. Insufficient pressure may lead to shorter pile height, while excessive pressure can cause the pile to become flattened or excessively long.
B. Uneven tension in the fabric Uneven tension in the fabric during the tufting process can cause variations in pile height. Tension inconsistencies may occur due to improper fabric stretching or securing, leading to uneven tufting results.
C. Incorrect needle height adjustment The needle height on the tufting gun plays a critical role in determining the pile height. Incorrect needle height adjustment can result in uneven pile height across the design.
Techniques to achieve uniform pile height
A. Maintaining consistent tufting gun pressure Consistency in tufting gun pressure is essential for achieving uniform pile height. Regularly check and adjust the pressure settings on your tufting gun to ensure consistent results throughout the project.
B. Ensuring even fabric tension Proper fabric tension is crucial in preventing variations in pile height. Stretch and secure the fabric tightly and evenly across the backing material, ensuring it remains stable and taut throughout the tufting process.
C. Proper needle height adjustment Accurate needle height adjustment is vital for achieving uniform pile height. Refer to the tufting gun’s instruction manual to determine the appropriate needle height for your specific fabric and design. Make necessary adjustments to ensure the needle penetrates the fabric to the desired depth.
Troubleshooting uneven pile height
A. Inspecting and adjusting tufting gun components Regularly inspect and maintain your tufting gun’s components, such as the needle, loopers, and pile depth control mechanism. Clean or replace any worn or damaged parts that may affect pile height consistency.
B. Revisiting fabric preparation and securing techniques If uneven pile height persists, review your fabric preparation and securing techniques. Ensure proper fabric stretching, secure fastening, and even distribution of tension across the fabric to eliminate any potential causes of uneven pile height.
[slide-anything id=”701″]
FancyBant Tufting Gun, Electric Carpet Rug Gun, Weaving Flocking Handheld
Creating Different Textures and Effects
Experiment with different yarns
Different types of yarn can create different textures and effects in your tufted designs. Try using a mix of thick and thin yarns or different types of fibers, such as wool or cotton, to create different textures.
Vary the length of the pile
Adjusting the length of the pile can create different effects in your tufted designs. Longer pile lengths can create a shaggy or fluffy look, while shorter pile lengths can create a more uniform and compact appearance.
Use different tufting techniques
There are several different tufting techniques you can use to create different effects, such as loop pile, cut pile, and combination pile. Experiment with different techniques to see what works best for your design.
Play with colors and patterns
Tufting guns offer endless possibilities when it comes to creating unique and colorful designs. Try playing with different color combinations and patterns to create one-of-a-kind works of art.